Tuesday, June 22, 2010

Apple Pie in a Paper Bag


 Last Thanksgiving we had dinner with Maren and Alex, and a few of his sisters. One of his sisters made this apple pie, cooked it in a paper bag. At first I was afraid the apartment building would burn down if the bag caught fire, but then after tasting this pie I was afraid she may never give me the recipe and I'd have to go to desperate measures to get it. Luckily when she left, she left open the email containing the recipe. That's right, I stole it from her email account!!! And I'm not even sorry!!! This pie is so good, and really its so easy, you don't even have to roll out any dough! I made this for a dinner get together we had with friends, and all those friends wanted the recipe too, so I'm sharing the wealth!


Apple Pie (paper bag-style)

CRUST
1 ½ cup flour
1 ½ tsp sugar
1 tsp salt
½  cup oil
2 Tbsp milk
FILLING
4 Granny Smith apples, peeled and sliced or enough to equal 6 cups (I used 6 apples because my apples were small, just fyi)
½ cup sugar
2 tbsp flour
½ tsp nutmeg
½ tsp cinnamon
TOPPING
½ cup sugar
½ cup flour
½ cup butter
To make the crust, mix the ingredients together. Press into a pie dish and press dough up the sides as well.
To make the filling, first stir together the dry ingredients and then add the apples. Mound apple filling into the crust-lined pan.
To make the topping, mix the ingredients together until the mixture is crumbly. Sprinkle over the apples and pat down a bit.
Place pie in medium-sized brown paper bag and fold over edges. Put this on a cookie sheet. (Pie makes a sticky mess on the bottom of the cookie sheet and pie dish but it comes off easily after soaked in water.)
Oven must be completely pre-heated to avoid burning the bag. Make sure that the bag does not touch the sides of the oven. Bake at 350* for 1 hour 10 minutes.
Remove pie from oven, tear away top of the bag and return pie to the oven for additional 10 minutes to crisp the top a bit.

I sprinkled the top with cinnamon because it made it look that much more beautiful... Don't forget vanilla ice cream...

Thursday, June 17, 2010

Asian Night!!!

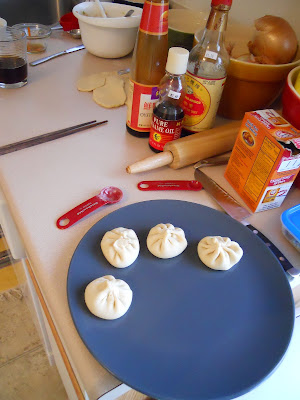
Asian Food! Morgan and I had some friends over awhile ago and we decided we wanted to make some yummy Asian food. There were a few recipes I had wanted to try and one that was so good I look for any chance to make it again! We ended up making steamed pork dumplings, stir-fried beef with ginger and celery (yum), and crunchy summer rolls, and it was all yummy. The steamed pork dumplings were something I ate a lot in Taiwan (or something very similar), I had wanted to try my hand at making them for a good, what, 4 years now since I've been home from Taiwan??? They turned out better than I'd even hoped for! The one thing I would alter is the filling, it was a little bland for my taste. I'd add more veggies, specifically chopped leeks, and some salt (or if you prefer more soy sauce - it is the Chinese salt after all) and white pepper probably.

That wasn't our prettiest spring roll, by the way... however the others weren't that much prettier either


I actually got these bamboo steamers for fairly cheap from an Asian food market. I just set it on top of that pot and it works perfectly.


Steamed Pork Dumplings

DOUGH
  • 2-2 1/2 cups all-purpose flour
  • 1 tbsp baking powder
  • 2/3 cup water
FILLING
  • 7 oz round lean pork
  • 1 1/2 tsp peeled and grated fresh ginger
  • 1 1/2 tbsp vegetable oil
  • 2 tbsp light soy sauce
  • about 1/2 cup water
  • 3/4 cup chopped napa cabbage, plus 2 whole leaves (these are to steam the dumplings on, so you'll actually need as many as it take to cover whatever surface you're steaming your dumplings on)
  • 1/4 cup chopped green spring onion, including tender green tops
  • 1 tbsp sesame oil
To prepare the dough, sift together 2 cups of the flour and the baking powder into a bowl. Make a well. Using a large spoon, mix quickly to form a workable dough. it should be soft enough to work easily, but not so sticky that it will adhere to the work surface. add additional flour if it is too moist until the correct texture is achieved. Turn it out onto a very lightly floured work surface and knead until firm and elastic, about 2 minutes. cover with a damp kitchen towel and let rest while you make the filling.

To prepare the filling, in a food processor, process the pork to a smooth paste. Add the ginger, vegetable oil and soy sauce and mix well. Gradually add up to 1/2 cup water 1 tablespoon at a time as needed to form a soft, moist filling. Add the chopped cabbage, green onions, and sesame oil and pulse until evenly mixed, but not puréed.

Cut the dough into 1- inch pieces. On the floured board, lightly roll out each piece of dough into a round 3 1/2" in diameter and 1/16 of an inch thick, making it slightly thinner at the edges. When all of the rounds are rolled out, cover them with a clean, dry cloth to keep them from drying out. You should have about 20 rounds.

To form each dumpling, place a dough round in the palm of 1 hand and put a spoonful of the filling in the center of the dough round. Using 3 fingers of the other hand, gather the edge of the dough together in small pinch-pleats, bringing it together at the top so that it encloses the filling. Twist the dumpling into a point at the top. Gently tap the dumpling on the work surface so that it forms into a round shape.

Bring water to a boil in the base of a steamer. Meanwhile, line bamboo steamer baskets or metal steamer racks with the whole cabbage leaves and top with the dumplings, leaving some space between them. Set the baskets or racks in the steamer, cover tightly, reduce the heat so the water continues to simmer steadily, and steam until the dumplings are slightly puffy and feel soft-firm (you know, soft-firm) to the touch, 7-9, minutes.

Carefully remove the baskets or racks from the steamer. Serve the dumplings in the baskets, or transfer them from the metal racks to a plate. Serve at once with vinegar or soy sauce in small dishes alongside for dipping. (I use a mixture of mostly soy sauce, and oyster sauce, with only a slight amount of sesame seed oil - little goes a long way- and some ginger paste. This mixed up makes my favorite dipping sauce for almost anything Chinese you'd like to dip - including spring rolls.)

This next recipe, I love and have made many times. It requires some specific ingredients, like light soy sauce, white pepper, and rice wine, but I've found that not only have I used these for other things besides just this recipe, but even if I only used it for this recipe I'd still buy it and make this over and over. One other thing about this dish, it is even better the day after. In fact I kinda prefer it on day 2, the flavors set in so nicely, you won't be able to have just one bite. Also I put this on steamed white rice, they're a perfect pairing. Well everything Chinese pairs perfectly with rice... in fact the verb "to eat" (chi fan) literally translates to "eat rice" (fan = rice) because if you were eating in China, you're most likely eating rice.

Stir-Fried Beef with Ginger and Celery 

  • 10 oz well-trimmed boneless beef steak such as rump or sirloin (pork is also really good) 
  • 2 tsp light soy sauce (there actually is a light and a dark soy sauce)
  • 1 tsp cornstarch
  • 1/4 tsp baking soda
  • 1 tbsp water

SAUCE

  • 1/4 cup chicken or beef stock
  • 2 tsp rice wine (Uwajimaya trip needed perhaps - trust me, this dish is worth it)
  • 2 tsp light soy sauce
  • 1 1/2 tsp cornstarch
  • 1/2 tsp superfine sugar (I use regular powdered sugar)

  • 1/3 cup vegetable oil
  • 8 thin slices fresh ginger, peeled and finely julienned
  • 3 green onions, including tender green tops, thinly sliced on the diagonal
  • 2 celery stalks, thinly sliced on the diagonal
  • salt and ground white pepper to taste

Cut the beef across the grain into paper-thin slices, then cut each slice into pieces about 1 1/2" long. Place in a dish, add the soy sauce, cornstarch, baking soda, and water, and mix well. Set aside marinate and tenderize for about 20 minutes.


To prepare the sauce, in a small bowl mix together, stirring slowly, the stock, rice wine, soy sauce, cornstarch and sugar.


In a wok over high heat, warm the oil until it shimmers and begins to smoke (but not until it catches fire, btw). Add the ginger, green onions, and celery and stir-fry until beginning to soften, about 30 seconds. Using a slotted spoon, transfer the vegetables to a plate and set aside.


With the wok still over high heat, add the beef and stir-fry, keeping the meat moving and turning in the wok constantly, until barely cooked, about 1 minute. Return the vegetable to the wok and stir-fry for about 20 seconds to mix well with the beef.


Pour the sauce mixture into the wok and stir until it is lightly thickened and glazes all the ingredients, about 30 seconds. Season with salt and white pepper.


Transfer to serving plate and serve at once.


This last recipe we made because we wanted to try a yummy, and not too complicated spring roll (the non-fried kind). The recipe is unique, if you don't like cilantro,  you won't like this because the main flavors are the cilantro and the mint. We actually chose to add shrimp and it made the roll, seriously. Rolling these, takes some patience if you've never done it before (perhaps even if you have).


Crunchy Summer Rolls

  • 12 rice-paper roll wrappers
  • 1 head lettuce, leaves separated and ribs removed
  • 2-3 carrots, cut into julienne strips
  • 1 small cucumber, peeled, halved lengthways and seeded, and cut into julienne strips
  • 3 spring onions trimmed and cut into julienne strips
  • 1 cup beansprouts
  • 1 bunch fresh mint leaves
  • 1 bunch fresh cilantro
  • cooked, peeled and deveined shrimp (about 2-3 per roll)
  • dipping sauce (see my version of yummy dipping sauce after the steamed pork dumplings recipe - or use straight up soy sauce, if you'd like)

Pour some lukewarm water into a shallow dish. soak the rice papers, 2-3 at a time (we did only one, as they started sticking together), for about 5 minutes until they are pliable (ours were dissolved after almost 1 minute so I'd say just test the texture, when its no longer hard, or when it's "pliable", you're good!). Place the soaked papers on a clean dish towel and cover with a second dish towel to keep them moist (again, ours were so soft and sticky we just wrapped them after each wrapper was ready- soak, wrap, soak, wrap).


Work with one paper at a time. Place a lettuce leaf towards the edge nearest to you, leaving about 1" to fold over. Place a mixture of the vegetables on top, followed by some mint and cilantro leaves, and shrimp.

Fold the edge nearest you over the filling, tuck in the sides, and roll tightly to the edge on the far side. Place the filled roll on a plate and cover with plastic wrap, so it doesn't dry out. repeat with the remaining rice papers and vegetables. Serve with a  dipping sauce of your choice. If you are making these summer rolls ahead of time, keep them in the refrigerator, under a damp dish towel, so they remain moist.

The steamed pork dumplings and the stir-fried beef with ginger and celery recipes are from a Williams-Sonoma cookbook called "Savoring China" by  Jacki Passmore, and the spring roll recipe is from a cookbook called "500 Chinese Recipes" (and yes it is intense) contributing editor Jenni Fleetwood. Might I add I bought the Savoring China book on Amazon used for like $3!!! Not including shipping of course, but it was so worth it!!! The other cookbook I found at Ross, $7.99 :)

Monday, June 14, 2010

Sweet Potato Ravioli


Ravioli! Maren actually gave me this recipe to share about 2 weeks ago, however I told her that seeing as she has a superb camera and some fine camera skills, I refuse to post her recipe without a picture. So now that she finally emailed me a picture about 2 weeks later (what is she, a Jensen???), I'm now posting this yummy sounding recipe. Good job Maren.
 

Sweet Potato Ravioli

·         1 medium size orange sweet potato or yam, cut into large pieces
·         3 tbls. olive oil
·         5 ½ oz. ricotta cheese
·         1 tbls. chopped basil
·         1 garlic clove, crushed
·         2 tbls. grated parmesan cheese
·         2x250 g (9 oz.) packets egg won ton wrappers
·         2 ¼ oz. butter (oil or Smart Balance work great)
·         4 spring onions (scallions), sliced on the diagonal
·         2 garlic cloves, extra, crushed
·         300 ml (10 ½ fl. oz.) pouring (whipping) cream
·         Baby basil leaves, to serve

Preheat the oven to 425 degrees.  Place the sweet potato on a baking tray and drizzle with olive oil.  Bake for 40 minutes, or until golden and tender.

Transfer the sweet potato to a bowl with the ricotta, basil, garlic and parmesan and mash until smooth.

Cover the won ton wrappers with a damp dish towel.  Place 2 level teaspoons of the sweet potato mixture into the center of one wrapper and brush the edges with a little water.  Top with another wrapper.  Place onto a baking tray lined with baking paper and cover with a dish towel.  Repeat with the remaining ingredients to make 60 ravioli, placing a sheet of baking paper between each layer.

Melt the butter in a frying pan.  Add the spring onion and garlic and cook over medium heat for 1 minute.  Add the cream, bring to a boil, then reduce the heat and simmer for 4-5 minutes, or until the cream has reduced and thickened.  Keep warm

Bring a large saucepan of water to a boil.  Cook the ravioli in batches for 2-4 minutes, or until just tender.  Drain well.  Ladle the hot sauce over the top of the ravioli, garnish with the basil leaves and serve immediately.

Thursday, June 10, 2010

Puyallup Fair Scones and Homemade Berry Freezer Jam


Occasionally I just miss these so much, I make them myself, and there is no better way to eat these than fresh out of the oven with homemade strawberry jam! (And butter, of course!!) This recipe is the Fisher Scone Recipe (aka fair scones) and the strawberry freezer jam recipe (you can use any berry really) is from the Better Homes and Gardens classic red and white cookbook. I was happy that Morgan came with this book ;)

Fisher Scones

• 2 ½ Cups Flour
• 2 tsp. Baking Powder
• 2 tbsp. Sugar
• ½ tsp. Salt
• 6 tbsp. Butter
• ¾ Cup Milk

  1. Sift flour  
  2. Resift with remaining dry ingredients
  3. Work butter into ingredients with fingers until it resembles coarse crumbs
  4. Add milk to mixture and knead dough
  5. Divide dough into 2 equal pieces
  6. On floured surface roll or pat each piece into a round about 3/4" thick
  7. Cut into 6 wedge shaped pieces per round
Bake at 425 degrees for about 10 minutes. (Now this is what works for me with my oven, the original recipe said bake at 450 for 15 minutes and I always had burnt scones. I know altitude can make a difference and I am in the mountain tops, but feel free to try this and just keep an eye on them until they turn slightly golden brown on the edges and they're perfect!!!


 Berry Freezer Jam

  • 4 Cups Fresh Blackberries, Raspberries, or hulled Strawberries
  • 4 Cups Sugar (yes!)
  • 1/2 tsp. finely shredded lemon peel (I like lemon so I did more like 1 1/2 tsp. and it has such a fresh flavor! I'm also curious to try some chopped basil, or lavender with the strawberry! Anyways, I digress)
  • 1 1.75-ounce package regular powdered fruit pectin (I only found 2 oz packages and just added a slight amount less and its good!)
  • 3/4 Cup Water
  1. In a bowl use a potato masher to crush the berries until you have 2 cups crushed berries. Mix berries, sugar, and lemon peel. Let stand for 10 minutes, stirring occasionally. In a small saucepan combine pectin and water. Bring to boiling over high heat; boil 1 minute, stirring constantly. remove from heat and add to berry mixture; stire for 3 minutes or until sugar is dissolved and mixture is no longer grainy.
  2. Ladle into half-pint freezer containers, leaving a 1/2-inch headspace (allowing room for frozen liquids to expand safely). Let stand at room temperature 24 hours or until set (mine was set within an hour... maybe because i had a bit more pectin, who knows, it's still good though). Store the jam for up to 3 weeks in the refrigerator or for up to 1 year in the freezer.
Enjoy! This is just perfect summer food to me :)

Tuesday, June 8, 2010

Brownie Pudding!

This Recipe is a recommendation from Anna. It's a barefoot Contessa recipe, so you know it's good and has no cilantro :P


http://www.foodnetwork.com/recipes/ina-garten/brownie-pudding-recipe/index.html
(btw, this is apparently a 5 star recipe)

This is one of those recipes that I would say you absolutely have to try!  You have to use good cocoa powder.  I used Rapunzel's and it was awesome (and it's organic and a fair trade cocoa).  I also used 1 tsp. vanilla extract instead of the vanilla bean.
It is a pudding type dessert so a toothpick will be moist, but, more fudgy and less wet. 
So good that I licked my bowl and the baking dish, but that's not altogether surprising for me :)
Don't forget the vanilla bean ice cream!!

 Brownie Pudding

 Ingredients


  • 1/2 pound (2 sticks) unsalted butter, plus extra for buttering the dish
  • 4 extra-large eggs, at room temperature
  • 2 cups sugar
  • 3/4 cup good cocoa powder
  • 1/2 cup all-purpose flour
  • Seeds scraped from 1 vanilla bean
  • 1 tablespoon framboise liqueur, optional
  • Vanilla ice cream, for serving

Directions

Preheat the oven to 325 degrees F. Lightly butter a 2-quart (9 by 12 by 2-inch) oval baking dish. Melt the 1/2 pound of butter and set aside to cool.

In the bowl of an electric mixer fitted with the paddle attachment, beat the eggs and sugar on medium-high speed for 5 to 10 minutes, until very thick and light yellow. Meanwhile, sift the cocoa powder and flour together and set aside.

When the egg and sugar mixture is ready, reduce the speed to low and add the vanilla seeds, framboise, if using, and the cocoa powder and flour mixture. Mix only until combined. With mixer still on low, slowly pour in the cooled butter and mix again just until combined.

Pour the brownie mixture into the prepared dish and place it in a larger baking pan. Add enough of the hottest tap water to the pan to come halfway up the side of the dish and bake for exactly 1 hour. A cake tester inserted 2 inches from the side will come out 3/4 clean. The center will appear very under-baked; this dessert is between a brownie and a pudding.

Allow to cool and serve with vanilla ice cream.

Tuesday, June 1, 2010

Maren cooks with Oatmeal... A lot

Maren is quite the oatmeal guru these days. You have a question on homemade granola, or a high sugar/vegan peanut butter bar and she's your girl! Seriously, Maren's granola is so good she gives it away as gifts and people are excited about it! It's true! The peanut butter bars are one of those recipes that you WILL eat half of them in about 1 hour!! Seriously. And for one more tasty (vegan) treat Maren has a vegan brownie recipe, which is as rich and moist as any brownie I've ever had. Good food.


Granola

·         8 cups rolled oats
·         ½ cup canola oil
·         ¾ cup pure maple syrup
·         ¼ cup honey
·         1 tbls. organic unsulphured molasses
·         1 tbls. pure vanilla extract
·         2 tsp. ground cinnamon
·         ½ tsp. salt

Combine all ingredients in a large mixing bowl and toss together until evenly combined.  In an oiled pan spread the granola mixture in a ¼ to ½ inch-thick layer on the baking sheet (I usually use the largest glass baking dish I have).  Bake for 45-60 minutes at 350 degrees, stirring every 10-15 minutes, until golden brown.

*I don’t like anything added to my granola but you can add almonds, coconut, dried fruit, sesame, pumpkin or sunflower seeds or anything you like.

_____________________________________________________

Baked Oatmeal

·         ¾ cup canola oil
·         1 2/3 cup brown sugar
·         4 eggs
·         5 cups uncooked oatmeal
·         2 tsp. baking soda
·         1 tsp. salt
·         1 2/3 cup milk

Mix all the ingredients and pour into a 9x13 inch oiled pan.  Bake at 350 degrees for 35 minutes.  Sprinkle with cinnamon immediately when removed from oven.

*sometimes instead of sprinkling cinnamon on at the end, we cut up strawberries, raspberries or whatever sounds good into small pieces and scatter those in the batter before baking and it tastes delicious.

______________________________________________________


Oatmeal Peanut Butter Bars

·         1 ½ cup uncooked oatmeal
·         ½ cup whole wheat flour
·         ½ cup white flour
·         ¼ tsp. baking soda
·         ¼ tsp. salt
·         2/3 cup canola oil
·         ½ cup maple syrup
·         2 tbls. water
·         2 tsp. vanilla
·         3-4 tbls. honey*
·         4 tbls. peanut butter*
·         2 tbls. brown sugar (if you feel the urge for a little more sweetness…)

Combine all dry ingredients first and then add wet ingredients.  Mix well (do not use electric mixer) and pour into an oiled 9x13 inch pan and bake at 350 degrees for 15-20 minutes or until toothpick comes out clean.

*because I made this up I always test the batter before I bake it to make sure that it tastes alright.  Sometimes it needs a little more peanut butter or honey, so add to taste. 

______________________________________________________

Fudgy Gluten-free Brownies

·         10 oz. good-quality bittersweet chocolate
·         1 2/3 sticks unsalted butter, diced
·         ½ cup unsweetened cocoa powder, sifted
·         4 eggs
·         1 cup superfine or granulated sugar
·         1 cup walnut or pecan pieces

Preheat oven to 350 degrees.  Break up the chocolate and put it in a heatproof bowl with the butter.  Set the bowl over a pan of steaming hot water and melt gently, stirring frequently (or you could probably just microwave it…).  Remove the bowl from the pan and stir in the cocoa.  Set aside until needed.

Put the eggs into a mixing bowl and beat well with a whisk or an electric mixer.  Add the sugar and whisk thoroughly until very light and frothy and doubled in volume.

Using a large metal spoon, carefully fold in the chocolate mixture followed by the nuts.  Transfer the mixture to the prepared pan and spread evenly.

Bake in the preheated oven for about 25-30 minutes until the top of the brownie pan is just firm to the touch but the center is still slightly soft.

Leave to cool for 10 minutes before carefully removing from the pan.  Serve warm or at room temperature.  Once cool, store in an airtight container and eat within 4 days.  Tastes delicious with vanilla bean ice cream.

Quinoa Chili

This is a recipe from our Maren. I was actually present the first time Maren made this and it was so good! It was easy, tasty, and vegetarian/gluten free/vegan!! That being said I can still vouch for its yumminess, and surprising heartiness! Enjoy!

Quinoa Chili

• 1 large onion, chopped
• 4 cloves garlic, minced
• 4 tsp. olive oil
• 4 cups chicken or vegetable broth
• 2 cups water
• 10 oz. chopped tomatoes
• 4 tsp. cumin
• 2 tsp. chili powder
• 1 tsp. coriander
• 1 cup quinoa


Sauté the onion and garlic with the olive oil until tender. Add the remaining ingredients and simmer for 20 minutes or until the quinoa is fully cooked.


BTW, at the moment I only have internet on limited days of the week, so if you don't hear from me after emailing, or you wonder why I haven't posted a new recipe, that's why. Love you all!