Did you know that the prime time for Grapefruit is January??? I didn't, until a couple days ago when I purchased some OH-SO-Delicious grapefruit from Whole Foods. You know those handy little informative signs they put next to some of the food items? Anyways, they do. To get to my point, I found the beautiful grapefruit and felt inspired to eat it... in a salad! Nothing too fancy here, but it was a darn good salad!
- 1 Head Green Leaf Lettuce
- 2 grapefruit
- 2 Satsuma oranges
- 1/3 cup caramelized pecans (to taste really)
- 1/3 cup crumbled goat cheese (again, to taste)
- Maine Wild Blueberry Marinade (its a vinaigrette dressing from Whole Foods, I found it in the produce section - I suppose you could try other berry vinaigrettes...)
Separate Grapefruit: Cut off top and bottom of grapefruit, then slice remaining skin till all you have is luscious red. Slice into about 8 slices (like you'd slice an orange). Proceed to remove the bitter membrane from each piece, leaving only the juicy goodness. (I use only technical/scientific terms....)
Peel and separate Satsuma orange like normal, tossing wedges into chopped green lettuce, along with grapefruit. Toss in caramelized pecans, goat cheese, and desired amount of dressing and eat right away :) For added fun, I was going to chop up mint leaves for added flavor, I forgot to do it so I don't know if it really would be worth it or not. Try it if you like, and if its yummy, let me know!
Sorry I didn't photograph the salad. It was good though, you can ask Brita and Maren, they ate it too.
Monday, December 27, 2010
Wednesday, August 4, 2010
Not your typical numbered recipe...
So it has been a long time since I have posted any new recipes. I apologize, but I moved, and started a second job so things have been a bit on the busy side. So lay off! Just kidding. I know you all will make it another day, or year, or decade, if I never blogged again. However I'm going to continue to blog! Just don't expect any sort of regularity.
Speaking of Irregular, normally this blog is all about the DELICIOUS foods you want to share, however sometimes we read an article or watch a documentary on foods (i.e. Food Inc.) and want to share that with the friends and family just as much! Not because it will delight any taste buds, in fact it may do the opposite. In many cases it may make you feel a little sick to your stomach, but only because its disturbing (!!!!) how little we as a society know about scientifically engineered/altered foods which we consume in large amounts and on a daily basis!!!! (BTW, do watch Food Inc, if you haven't already). Foods that taste good are important, but more important is foods that ARE good. Good for you. So here's an article (forwarded from Mom/Susan). Read, enjoy, and be more educated as to how to take care of yourself and those you love!
"Cancer cells slurp up fructose, US study finds"
http://www.reuters.com/article/idAFN0210830520100802
Eat Well :)
Tuesday, July 20, 2010
Chocolate Chip Cookies with Oatmeal and Pecans
Because there is no end to the goodness of the Chocolate Chip, here is an delight some cookie recipe from the Once Upon a Tart cookbook. Which if you don't have, you might want to think about getting yourself one. Not only because the recipe are so good, but it's fun to read, and has lots of good tips.
Recipe brought to you by Susan:
"All of you who have Once Upon a Tart know that it is a fantastic cookbook with lots of yummy looking recipes. I swear about 85% of them are on my list to try - not something I could say about most cookbooks. The scones are especially delicious and hard to resist. I could eat one or two every day of my life, they are so good. So I thought I'd try baking their cookies for Sammy's birthday. These are chocolate chip with oatmeal and pecans and I thought they turned out pretty good. They are a variation of their chocolate chip cookies, which the authors say are the best selling cookies in their NYC cafe. I used all whole wheat flour which turned out fine and left the raisins out - I ALWAYS leave the raisins out. Nothing like raisins to ruin a delicious baked good. I think you could use a little less sugar and they'd still be plenty sweet - maybe 1/4 cup or so."

From the cookbook Once Upon A Tart
Recipe brought to you by Susan:
"All of you who have Once Upon a Tart know that it is a fantastic cookbook with lots of yummy looking recipes. I swear about 85% of them are on my list to try - not something I could say about most cookbooks. The scones are especially delicious and hard to resist. I could eat one or two every day of my life, they are so good. So I thought I'd try baking their cookies for Sammy's birthday. These are chocolate chip with oatmeal and pecans and I thought they turned out pretty good. They are a variation of their chocolate chip cookies, which the authors say are the best selling cookies in their NYC cafe. I used all whole wheat flour which turned out fine and left the raisins out - I ALWAYS leave the raisins out. Nothing like raisins to ruin a delicious baked good. I think you could use a little less sugar and they'd still be plenty sweet - maybe 1/4 cup or so."

Best Big Chocolate Chip Cookies pg 314 and the Variation: a.k.a. The Cookie Frank (Co-Author) Is Most Likely to Bake on a Rainy Day pg 315
- 20 tbsp (2 1/2 sticks) unsalted butter, softened
- 1 1/2 cups packed light-brown sugar
- 2 large eggs
- 1 tsp vanilla extract
- 3 1/4 cups unbleached all-purpose flour
- 1 1/2 tsp baking soda
- 1 1/2 tsp salt
- 2 cups semisweet chocolate chips; or 12 ounces good quality dark chocolate, broken into pieces
- Position your oven racks so that one is in the center, and preheat the oven to 350 degrees.
- Cream the butter and sugar together in a big bowl, using the whisk attachment of an electric mixer on high speed (or a sturdy wire whisk), until they are fluffy and light lemon-yellow in color, about 5 minutes. with the mixer on low speed, beat in the eggs one at a time, then the vanilla.
- In a separate, medium-sized bowl, whisk the flour, baking soda, and salt together. Gradually add this to wet ingredients, using the paddle attachment of your mixer on low speed (or stirring with a wooden spoon) until no flour is visible. Then stir in the chocolate chips.
- To make big cookies, use a 1/3 cup or your hand (eyeballing for size) to scoop out the dough. Roll the dough for each cookie between your hands into a ball. Have some flour handy to dust your hands in case the dough is too sticky to work with. Place the balls on your baking sheet, leaving 2 inches between them, and flatten each with the heel of your hand until it is about 4 inches in diameter. To make smaller cookies, use a teaspoon to scoop up the dough and your finger to scrape it onto the baking sheet. Drop the cookies 1 1/2 inches apart - no flattening necessary.
- Place the baking sheet on the center rack in the oven, and bake the cookies for 18-20 minutes (10-12 for smaller cookies), or until the cookie centers no longer have the shiny look of raw dough.
- Remove the baking sheet from the oven, and place on a wire rack to cool slightly. Lift the baking sheet off the rack, and use a metal spatula to lift the cookies off the sheet and onto the rack to cool completely. If you're using parchment paper, there's no need to let the cookies cool on the rack. Slide the paper with the hot cookies off the baking sheet and onto a flat surface to cool.
Variation:
- 2 cups unbleached all-purpose flour
- 1 tsp baking soda
- 3/4 tsp salt
- 1/2 lb (2 sticks) unsalted butter, softened
- 1/2 cup granulated sugar
- 1 cup packed light brown sugar
- 2 tsp vanilla extract
- 2 large eggs
- 1 1/2 cups semisweet chocolate chips; or 9 ounces good-quality dark chocolate, broken into pieces
- 2 cups rolled oats (not quick-cook or instant)
- 1/2 cup pecans, coarsely chopped
- OPTIONAL 1/2 cup dark raisins (if you like your cookies to be ruined)
From the cookbook Once Upon A Tart
Saturday, July 17, 2010
Blueberry Cake
If I may, I'd like to preface this next entry with some food for thought. This entry is from Anna (Banana), it is her fifth time contributing a recipe to this blog. And yes it is a dessert. Four out of five times her recipes have been some sort of spectacular sounding dessert. Only her first entry was a savory entrée (obviously a front). A few things can be deducted from this fact: One, I love Anna and wish I could visit her more often. Two, Anna has the metabolism of a mouse who's heart beats 500 times per minute, and that is why she is still so very very tiny.
I DO love you Anna, and I DO wish I could visit you every time you make desserts... and when you don't. I DO! I DO! (said the same way Jack used to say it when he was little)
Anna:
"Yep - another dessert. life is short, right? I love this cake! made it 2x in one weekend! I also made a blueberry crumble (just to see which I liked better) and I like this one much more. It's very moist and the lemon blueberry combo is summer delish! "

Blueberry Cake Recipe
INGREDIENTS
- 1 cup all purpose flour plus 1 teaspoon of flour (plus more for prepping cake pan)
- 1 teaspoon baking powder
- 1/2 teaspoon salt
- 4 oz (1 stick) unsalted butter, softened
- 1 cup sugar
- 1/4 teaspoon vanilla
- 2 large eggs
- 2 cups blueberries, rinsed and drained (if using frozen blueberries, thaw and drain first)
- 1 teaspoon lemon juice
- Powdered sugar for dusting
METHOD
1 Preheat oven to 350°F. Lightly butter a 9-inch springform pan and dust with flour. Or use a 9-inch round cake pan, butter and dust with flour and line the bottom with parchment paper.
2 Combine 1 cup of flour with baking powder and salt and set aside.
3 Using a mixer, beat the butter on medium high speed for 2 minutes. Then add the sugar and vanilla and beat until light and fluffy, a couple minutes more. Add the eggs one at a time and beat until well blended. Reduce the speed of the mixer to low and slowly add the flour mixture, beating until smooth. Pour the batter into the prepared baking pan.
4 Combine the berries with the remaining teaspoon of flour and the lemon juice in a bowl. Spoon the berry mixture over the batter.
5 Bake on middle rack in oven for 1 hour at 350°F, or until a toothpick inserted into the center comes out clean. Remove from oven and let the cake cool in the pan for 10 minutes. Carefully slide a thin knife around the edges of the cake to release it from the pan. Transfer the cake to a platter, berry side up. Dust the cake with powdered sugar before serving.
Thursday, July 8, 2010
Great Harvest Chocolate Chip Cookies!!!!
I have ALWAYS loved Great Harvest Chocolate Chip Cookies! What's not to love??? They're huge, for one, they are perfectly moist, perfectly chewy, and they have the richest, most hearty taste of any chocolate chip cookie I've ever had. I would say they're most comparable to the infamous vegan chocolate chip recipe (which I'll have to post soon) except they are not vegan, and personally I'm totally fine with that. Last night I was majorly craving some yummy cookies (perhaps you saw my facebook status) and these cookies came to mind. I looked up this recipe online, wasn't sure how close to the real thing they'd be, but decided it was worth a try. My first bite was so good, it brought me back to when I was little, going to the Great Harvest on Sand Point Way in Seattle with Mom, Brita and Maren and getting these seemingly HUGE cookies, and a free slice of Oh-so-good Great Harvest white bread with lots o' butter. I loved those days :) And I love these cookies:

Great Harvest Bread Co. Chocolate Chip Cookies:
2 cups whole wheat flour
1 teaspoon baking powder
1/2 teaspoon baking soda
1/4 teaspoon salt
2 cups brown sugar, packed
1 cup butter, softened
2 cups rolled oats
2 eggs
2 tablespoons molasses (may be substituted with honey, or maple syrup - the real stuff)
1 tablespoon milk
1 (12 ounce) pkg semisweet chocolate chips (The Whole Thing Baby!!!)
Preheat oven to 350 degrees F.
Combine flour, baking powder, baking soda, and salt; set aside.
Beat together brown sugar and butter until well combined. Add oats, eggs, molasses (or whatever), and milk; beat well. Add dry ingredients to beaten mixture; beat until blended. Stir in chocolate chips. Using a 1/4 cup measuring cup, scoop dough and drop about 3 inches apart onto ungreased cookie sheets. I found that as this is such a big cookie it was helpful when dropping the cookies, to also squish the cookies till they're just about 3/4-1 inch tall (that way they spread out more, rather than just become really thick. However if you like them thick, then by all means omit the squishing step)
Bake at 350 degrees F for12 to 13 minutes, until just starting to brown around the outside (I only bake mine for 10 minutes - not sure if that's an altitude thing, or just a "my oven" thing). Cool 2 minutes on cookie sheets. Remove and cool on racks.
recipe found at: http://www.recipelink.com/mf/14/24199
Monday, July 5, 2010
Chocolate Hazelnut Gelato
This addition is from Anna, however, I'm sure you would have figured that out even if you didn't notice the reference to Matt or Jack. The fact it's an ice cream recipe should have given it away :)
The creamiest, yummiest, ice cream! Matt even said he likes it as much as Tillamook Peanut Butter Chocolate Ice Cream. If you know Matt (or Tillamook's infamous PBC) you know that means a lot!! It is so silky and so easy! We doubled the batch and generously shared with a couple friends and quickly regretted it :) It was gone too fast! Even the kids liked it. I wasn't sure they would go for the hazelnut flavor in Nutella, but Jack keeps saying he wants this for his birthday dessert. Yum, yum, yum!
Giadas Chocolate Hazelnut Gelato:
Ingredients:
2 cups whole milk
1 cup heavy cream
1/2 cup sugar, plus 1/4 cup
4 egg yolks
1/2 teaspoon vanilla extract
1/2 cup chocolate-hazelnut spread (recommended: Nutella)
1/2 cup toasted hazelnuts, crushed, for garnish
Directions
In a saucepan combine the milk, cream, and 1/2 cup sugar over medium heat. Cook until the sugar dissolves, about 5 minutes.
Meanwhile, in a medium bowl whip the egg yolks with the remaining sugar using an electric mixer until the eggs have become thick and pale yellow, about 4 minutes. Pour 1/2 cup of the warm milk and cream mixture into the egg mixture and stir. Add this mixture back into the saucepan. Cook over very low heat, stirring constantly, until the mixture becomes thick enough to coat the back of a wooden spoon, about 7 to 10 minutes.
Place a strainer over a medium bowl and pour the warm custard mixture through the strainer. Stir in the vanilla and hazelnut spread until it dissolves. Chill mixture completely before pouring into an ice cream maker and follow manufacturer's instructions to freeze. To serve, scoop gelato into serving bowls and top with hazelnuts.

Thursday, July 1, 2010
The Enchiladas they serve in Heaven!!!
That's right, I said Heaven. Now I have never been to Heaven, and I don't know that food is all the rage there, but all I can say is a world without these would be like Hell to me, Hence they've gotta be from Heaven!!! But seriously, I ate about 1/3 of the pan in one day, just ask Morgan who came home yesterday wondering if I had done anything else but eat enchiladas! These are great because you can make a ton of them and freeze part of them. However if you're like me they won't stay in the freezer long.
This is a recipe that I got from a friend, and then changed a few things so they reached the level of Heavenly. They are originally made with shredded chicken, but why would you choose boring, boiled in water and shredded chicken when you can have slow roasted in salsa and enchilada sauce pulled pork! I think this recipe is so good however you could try many different options. Anna and I were talking about it and decided it would be good with beans, extra grilled veggies, and some spruced up Mexican rice! You could even add some hominy, or some kind of white flaky fish, precooked in butter, or shrimp!!! Sky's the limit really. That being said, here's how I enjoy them:

Heaven Sent Enchiladas:
-->Preheat oven to 350 degrees. In medium skillet, melt butter over medium heat and cook the onion and bell peppers until just soft, about 5-8 minutes, then transfer to large bowl. Add the pork (or whatever your filling is going to be), -->cheddar cheese, green chilies, salsa, cilantro, cumin, and jalapeno chilies, if desired. Season with salt and pepper to taste and mix well. (I dare you to try not to eat too much of the filling when making sure it's seasoned well)
Lightly grease a 10x15x2 inch baking pan or 2 smaller pans (I use up to 3 even if I make enough filling). Then place 1 flour tortilla on a flat surface and place about 1/3 cup filling mixture along one side. Roll up from filling side and place seam side down in prepared tray. Repeat this process with the remaining to chicken mixture and tortillas. Sprinkle Monterey Jack over enchiladas (You can prepare the pans of enchiladas until this point one day in advance, chill and cover - I have even frozen them for a few days - wrapped tight in plastic wrap)
-->

This is a recipe that I got from a friend, and then changed a few things so they reached the level of Heavenly. They are originally made with shredded chicken, but why would you choose boring, boiled in water and shredded chicken when you can have slow roasted in salsa and enchilada sauce pulled pork! I think this recipe is so good however you could try many different options. Anna and I were talking about it and decided it would be good with beans, extra grilled veggies, and some spruced up Mexican rice! You could even add some hominy, or some kind of white flaky fish, precooked in butter, or shrimp!!! Sky's the limit really. That being said, here's how I enjoy them:

Heaven Sent Enchiladas:
- 2 1/2 to 3 pounds of Pork Butt Roast (slow cooked for about 4-5 hours on high. I usually cook mine covered in about half a jar of salsa of your choice, and one can of green enchilada sauce.)
- 1 tbsp butter
- 1 cup (or more) chopped onion
- 1 green bell pepper, chopped and seeded
- 1 red bell pepper, chopped and seeded
- 1/2 cup or so of frozen corn
- 8 oz grated cheddar
- 1 14-oz can (I use 2) diced green chilies
- 1 cup purchased green salsa (if you make this salsa yourself then by all means, use that)
- 1/4-1/2 cup chopped cilantro (the hero of any recipe)
- 4 tsp ground cumin
- 1/2 cup chopped canned Jalapenos - optional
- 15+ Costco uncooked tortillas - cooked on stove top until fluffy, but not crispy! (the number of tortillas you need will of course vary with how much filling you make, i.e. size of the roast, if you really go heavy on the onions, whatever - this is an easy to play with and easy to make yummy recipe.)
- Salt and freshly ground pepper to taste
- 10 oz Monterey jack cheese
- 1 cup Heavy/whipping cream
- 1/2 cup Chicken broth (for those vegetarian out there I know they make a No Chicken Chicken Broth, but veggie broth I'm sure would still be yummy)
-->Preheat oven to 350 degrees. In medium skillet, melt butter over medium heat and cook the onion and bell peppers until just soft, about 5-8 minutes, then transfer to large bowl. Add the pork (or whatever your filling is going to be), -->cheddar cheese, green chilies, salsa, cilantro, cumin, and jalapeno chilies, if desired. Season with salt and pepper to taste and mix well. (I dare you to try not to eat too much of the filling when making sure it's seasoned well)
Lightly grease a 10x15x2 inch baking pan or 2 smaller pans (I use up to 3 even if I make enough filling). Then place 1 flour tortilla on a flat surface and place about 1/3 cup filling mixture along one side. Roll up from filling side and place seam side down in prepared tray. Repeat this process with the remaining to chicken mixture and tortillas. Sprinkle Monterey Jack over enchiladas (You can prepare the pans of enchiladas until this point one day in advance, chill and cover - I have even frozen them for a few days - wrapped tight in plastic wrap)
-->
Combine the cream and chicken broth and pour over enchiladas(the best part!!!). Then cover the pan with foil and bake for 30 minutes. After 30 minutes remove foil and continue baking 10 minutes or until thoroughly heated.
Place 1 or 2 enchiladas on individual serving plates, for added Happiness you can garnish with avocado, tomato, and cilantro, if desired. Or whatever sounds good to you (I eat them plain, or sometimes with salsa on top)

Tuesday, June 22, 2010
Apple Pie in a Paper Bag

Last Thanksgiving we had dinner with Maren and Alex, and a few of his sisters. One of his sisters made this apple pie, cooked it in a paper bag. At first I was afraid the apartment building would burn down if the bag caught fire, but then after tasting this pie I was afraid she may never give me the recipe and I'd have to go to desperate measures to get it. Luckily when she left, she left open the email containing the recipe. That's right, I stole it from her email account!!! And I'm not even sorry!!! This pie is so good, and really its so easy, you don't even have to roll out any dough! I made this for a dinner get together we had with friends, and all those friends wanted the recipe too, so I'm sharing the wealth!
Apple Pie (paper bag-style)
CRUST
1 ½ cup flour
1 ½ tsp sugar
1 tsp salt
½ cup oil
2 Tbsp milk
1 ½ tsp sugar
1 tsp salt
½ cup oil
2 Tbsp milk
FILLING
4 Granny Smith apples, peeled and sliced or enough to equal 6 cups (I used 6 apples because my apples were small, just fyi)
½ cup sugar
2 tbsp flour
½ tsp nutmeg
½ tsp cinnamon
½ cup sugar
2 tbsp flour
½ tsp nutmeg
½ tsp cinnamon
TOPPING
½ cup sugar
½ cup flour
½ cup butter
½ cup flour
½ cup butter
To make the crust, mix the ingredients together. Press into a pie dish and press dough up the sides as well.
To make the filling, first stir together the dry ingredients and then add the apples. Mound apple filling into the crust-lined pan.
To make the topping, mix the ingredients together until the mixture is crumbly. Sprinkle over the apples and pat down a bit.
Place pie in medium-sized brown paper bag and fold over edges. Put this on a cookie sheet. (Pie makes a sticky mess on the bottom of the cookie sheet and pie dish but it comes off easily after soaked in water.)
Oven must be completely pre-heated to avoid burning the bag. Make sure that the bag does not touch the sides of the oven. Bake at 350* for 1 hour 10 minutes.
Oven must be completely pre-heated to avoid burning the bag. Make sure that the bag does not touch the sides of the oven. Bake at 350* for 1 hour 10 minutes.
Remove pie from oven, tear away top of the bag and return pie to the oven for additional 10 minutes to crisp the top a bit.
I sprinkled the top with cinnamon because it made it look that much more beautiful... Don't forget vanilla ice cream...
Thursday, June 17, 2010
Asian Night!!!
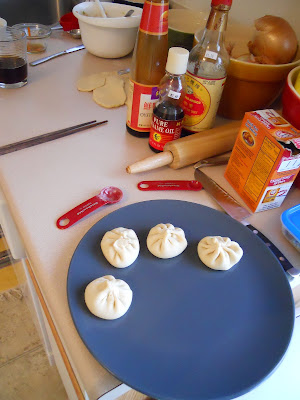
Asian Food! Morgan and I had some friends over awhile ago and we decided we wanted to make some yummy Asian food. There were a few recipes I had wanted to try and one that was so good I look for any chance to make it again! We ended up making steamed pork dumplings, stir-fried beef with ginger and celery (yum), and crunchy summer rolls, and it was all yummy. The steamed pork dumplings were something I ate a lot in Taiwan (or something very similar), I had wanted to try my hand at making them for a good, what, 4 years now since I've been home from Taiwan??? They turned out better than I'd even hoped for! The one thing I would alter is the filling, it was a little bland for my taste. I'd add more veggies, specifically chopped leeks, and some salt (or if you prefer more soy sauce - it is the Chinese salt after all) and white pepper probably.


Steamed Pork Dumplings
DOUGH
To prepare the filling, in a food processor, process the pork to a smooth paste. Add the ginger, vegetable oil and soy sauce and mix well. Gradually add up to 1/2 cup water 1 tablespoon at a time as needed to form a soft, moist filling. Add the chopped cabbage, green onions, and sesame oil and pulse until evenly mixed, but not puréed.
Cut the dough into 1- inch pieces. On the floured board, lightly roll out each piece of dough into a round 3 1/2" in diameter and 1/16 of an inch thick, making it slightly thinner at the edges. When all of the rounds are rolled out, cover them with a clean, dry cloth to keep them from drying out. You should have about 20 rounds.
To form each dumpling, place a dough round in the palm of 1 hand and put a spoonful of the filling in the center of the dough round. Using 3 fingers of the other hand, gather the edge of the dough together in small pinch-pleats, bringing it together at the top so that it encloses the filling. Twist the dumpling into a point at the top. Gently tap the dumpling on the work surface so that it forms into a round shape.
Bring water to a boil in the base of a steamer. Meanwhile, line bamboo steamer baskets or metal steamer racks with the whole cabbage leaves and top with the dumplings, leaving some space between them. Set the baskets or racks in the steamer, cover tightly, reduce the heat so the water continues to simmer steadily, and steam until the dumplings are slightly puffy and feel soft-firm (you know, soft-firm) to the touch, 7-9, minutes.
Carefully remove the baskets or racks from the steamer. Serve the dumplings in the baskets, or transfer them from the metal racks to a plate. Serve at once with vinegar or soy sauce in small dishes alongside for dipping. (I use a mixture of mostly soy sauce, and oyster sauce, with only a slight amount of sesame seed oil - little goes a long way- and some ginger paste. This mixed up makes my favorite dipping sauce for almost anything Chinese you'd like to dip - including spring rolls.)
This next recipe, I love and have made many times. It requires some specific ingredients, like light soy sauce, white pepper, and rice wine, but I've found that not only have I used these for other things besides just this recipe, but even if I only used it for this recipe I'd still buy it and make this over and over. One other thing about this dish, it is even better the day after. In fact I kinda prefer it on day 2, the flavors set in so nicely, you won't be able to have just one bite. Also I put this on steamed white rice, they're a perfect pairing. Well everything Chinese pairs perfectly with rice... in fact the verb "to eat" (chi fan) literally translates to "eat rice" (fan = rice) because if you were eating in China, you're most likely eating rice.
Stir-Fried Beef with Ginger and Celery
SAUCE
Cut the beef across the grain into paper-thin slices, then cut each slice into pieces about 1 1/2" long. Place in a dish, add the soy sauce, cornstarch, baking soda, and water, and mix well. Set aside marinate and tenderize for about 20 minutes.
To prepare the sauce, in a small bowl mix together, stirring slowly, the stock, rice wine, soy sauce, cornstarch and sugar.
In a wok over high heat, warm the oil until it shimmers and begins to smoke (but not until it catches fire, btw). Add the ginger, green onions, and celery and stir-fry until beginning to soften, about 30 seconds. Using a slotted spoon, transfer the vegetables to a plate and set aside.
With the wok still over high heat, add the beef and stir-fry, keeping the meat moving and turning in the wok constantly, until barely cooked, about 1 minute. Return the vegetable to the wok and stir-fry for about 20 seconds to mix well with the beef.
Pour the sauce mixture into the wok and stir until it is lightly thickened and glazes all the ingredients, about 30 seconds. Season with salt and white pepper.
Transfer to serving plate and serve at once.
This last recipe we made because we wanted to try a yummy, and not too complicated spring roll (the non-fried kind). The recipe is unique, if you don't like cilantro, you won't like this because the main flavors are the cilantro and the mint. We actually chose to add shrimp and it made the roll, seriously. Rolling these, takes some patience if you've never done it before (perhaps even if you have).
Crunchy Summer Rolls
Pour some lukewarm water into a shallow dish. soak the rice papers, 2-3 at a time (we did only one, as they started sticking together), for about 5 minutes until they are pliable (ours were dissolved after almost 1 minute so I'd say just test the texture, when its no longer hard, or when it's "pliable", you're good!). Place the soaked papers on a clean dish towel and cover with a second dish towel to keep them moist (again, ours were so soft and sticky we just wrapped them after each wrapper was ready- soak, wrap, soak, wrap).
Work with one paper at a time. Place a lettuce leaf towards the edge nearest to you, leaving about 1" to fold over. Place a mixture of the vegetables on top, followed by some mint and cilantro leaves, and shrimp.
Fold the edge nearest you over the filling, tuck in the sides, and roll tightly to the edge on the far side. Place the filled roll on a plate and cover with plastic wrap, so it doesn't dry out. repeat with the remaining rice papers and vegetables. Serve with a dipping sauce of your choice. If you are making these summer rolls ahead of time, keep them in the refrigerator, under a damp dish towel, so they remain moist.
The steamed pork dumplings and the stir-fried beef with ginger and celery recipes are from a Williams-Sonoma cookbook called "Savoring China" by Jacki Passmore, and the spring roll recipe is from a cookbook called "500 Chinese Recipes" (and yes it is intense) contributing editor Jenni Fleetwood. Might I add I bought the Savoring China book on Amazon used for like $3!!! Not including shipping of course, but it was so worth it!!! The other cookbook I found at Ross, $7.99 :)

That wasn't our prettiest spring roll, by the way... however the others weren't that much prettier either


I actually got these bamboo steamers for fairly cheap from an Asian food market. I just set it on top of that pot and it works perfectly.
DOUGH
- 2-2 1/2 cups all-purpose flour
- 1 tbsp baking powder
- 2/3 cup water
- 7 oz round lean pork
- 1 1/2 tsp peeled and grated fresh ginger
- 1 1/2 tbsp vegetable oil
- 2 tbsp light soy sauce
- about 1/2 cup water
- 3/4 cup chopped napa cabbage, plus 2 whole leaves (these are to steam the dumplings on, so you'll actually need as many as it take to cover whatever surface you're steaming your dumplings on)
- 1/4 cup chopped green spring onion, including tender green tops
- 1 tbsp sesame oil
To prepare the filling, in a food processor, process the pork to a smooth paste. Add the ginger, vegetable oil and soy sauce and mix well. Gradually add up to 1/2 cup water 1 tablespoon at a time as needed to form a soft, moist filling. Add the chopped cabbage, green onions, and sesame oil and pulse until evenly mixed, but not puréed.
Cut the dough into 1- inch pieces. On the floured board, lightly roll out each piece of dough into a round 3 1/2" in diameter and 1/16 of an inch thick, making it slightly thinner at the edges. When all of the rounds are rolled out, cover them with a clean, dry cloth to keep them from drying out. You should have about 20 rounds.
To form each dumpling, place a dough round in the palm of 1 hand and put a spoonful of the filling in the center of the dough round. Using 3 fingers of the other hand, gather the edge of the dough together in small pinch-pleats, bringing it together at the top so that it encloses the filling. Twist the dumpling into a point at the top. Gently tap the dumpling on the work surface so that it forms into a round shape.
Bring water to a boil in the base of a steamer. Meanwhile, line bamboo steamer baskets or metal steamer racks with the whole cabbage leaves and top with the dumplings, leaving some space between them. Set the baskets or racks in the steamer, cover tightly, reduce the heat so the water continues to simmer steadily, and steam until the dumplings are slightly puffy and feel soft-firm (you know, soft-firm) to the touch, 7-9, minutes.
Carefully remove the baskets or racks from the steamer. Serve the dumplings in the baskets, or transfer them from the metal racks to a plate. Serve at once with vinegar or soy sauce in small dishes alongside for dipping. (I use a mixture of mostly soy sauce, and oyster sauce, with only a slight amount of sesame seed oil - little goes a long way- and some ginger paste. This mixed up makes my favorite dipping sauce for almost anything Chinese you'd like to dip - including spring rolls.)
This next recipe, I love and have made many times. It requires some specific ingredients, like light soy sauce, white pepper, and rice wine, but I've found that not only have I used these for other things besides just this recipe, but even if I only used it for this recipe I'd still buy it and make this over and over. One other thing about this dish, it is even better the day after. In fact I kinda prefer it on day 2, the flavors set in so nicely, you won't be able to have just one bite. Also I put this on steamed white rice, they're a perfect pairing. Well everything Chinese pairs perfectly with rice... in fact the verb "to eat" (chi fan) literally translates to "eat rice" (fan = rice) because if you were eating in China, you're most likely eating rice.
Stir-Fried Beef with Ginger and Celery
- 10 oz well-trimmed boneless beef steak such as rump or sirloin (pork is also really good)
- 2 tsp light soy sauce (there actually is a light and a dark soy sauce)
- 1 tsp cornstarch
- 1/4 tsp baking soda
- 1 tbsp water
SAUCE
- 1/4 cup chicken or beef stock
- 2 tsp rice wine (Uwajimaya trip needed perhaps - trust me, this dish is worth it)
- 2 tsp light soy sauce
- 1 1/2 tsp cornstarch
- 1/2 tsp superfine sugar (I use regular powdered sugar)
- 1/3 cup vegetable oil
- 8 thin slices fresh ginger, peeled and finely julienned
- 3 green onions, including tender green tops, thinly sliced on the diagonal
- 2 celery stalks, thinly sliced on the diagonal
- salt and ground white pepper to taste
Cut the beef across the grain into paper-thin slices, then cut each slice into pieces about 1 1/2" long. Place in a dish, add the soy sauce, cornstarch, baking soda, and water, and mix well. Set aside marinate and tenderize for about 20 minutes.
To prepare the sauce, in a small bowl mix together, stirring slowly, the stock, rice wine, soy sauce, cornstarch and sugar.
In a wok over high heat, warm the oil until it shimmers and begins to smoke (but not until it catches fire, btw). Add the ginger, green onions, and celery and stir-fry until beginning to soften, about 30 seconds. Using a slotted spoon, transfer the vegetables to a plate and set aside.
With the wok still over high heat, add the beef and stir-fry, keeping the meat moving and turning in the wok constantly, until barely cooked, about 1 minute. Return the vegetable to the wok and stir-fry for about 20 seconds to mix well with the beef.
Pour the sauce mixture into the wok and stir until it is lightly thickened and glazes all the ingredients, about 30 seconds. Season with salt and white pepper.
Transfer to serving plate and serve at once.
This last recipe we made because we wanted to try a yummy, and not too complicated spring roll (the non-fried kind). The recipe is unique, if you don't like cilantro, you won't like this because the main flavors are the cilantro and the mint. We actually chose to add shrimp and it made the roll, seriously. Rolling these, takes some patience if you've never done it before (perhaps even if you have).
Crunchy Summer Rolls
- 12 rice-paper roll wrappers
- 1 head lettuce, leaves separated and ribs removed
- 2-3 carrots, cut into julienne strips
- 1 small cucumber, peeled, halved lengthways and seeded, and cut into julienne strips
- 3 spring onions trimmed and cut into julienne strips
- 1 cup beansprouts
- 1 bunch fresh mint leaves
- 1 bunch fresh cilantro
- cooked, peeled and deveined shrimp (about 2-3 per roll)
- dipping sauce (see my version of yummy dipping sauce after the steamed pork dumplings recipe - or use straight up soy sauce, if you'd like)
Pour some lukewarm water into a shallow dish. soak the rice papers, 2-3 at a time (we did only one, as they started sticking together), for about 5 minutes until they are pliable (ours were dissolved after almost 1 minute so I'd say just test the texture, when its no longer hard, or when it's "pliable", you're good!). Place the soaked papers on a clean dish towel and cover with a second dish towel to keep them moist (again, ours were so soft and sticky we just wrapped them after each wrapper was ready- soak, wrap, soak, wrap).
Work with one paper at a time. Place a lettuce leaf towards the edge nearest to you, leaving about 1" to fold over. Place a mixture of the vegetables on top, followed by some mint and cilantro leaves, and shrimp.
Fold the edge nearest you over the filling, tuck in the sides, and roll tightly to the edge on the far side. Place the filled roll on a plate and cover with plastic wrap, so it doesn't dry out. repeat with the remaining rice papers and vegetables. Serve with a dipping sauce of your choice. If you are making these summer rolls ahead of time, keep them in the refrigerator, under a damp dish towel, so they remain moist.
The steamed pork dumplings and the stir-fried beef with ginger and celery recipes are from a Williams-Sonoma cookbook called "Savoring China" by Jacki Passmore, and the spring roll recipe is from a cookbook called "500 Chinese Recipes" (and yes it is intense) contributing editor Jenni Fleetwood. Might I add I bought the Savoring China book on Amazon used for like $3!!! Not including shipping of course, but it was so worth it!!! The other cookbook I found at Ross, $7.99 :)
Monday, June 14, 2010
Sweet Potato Ravioli
Ravioli! Maren actually gave me this recipe to share about 2 weeks ago, however I told her that seeing as she has a superb camera and some fine camera skills, I refuse to post her recipe without a picture. So now that she finally emailed me a picture about 2 weeks later (what is she, a Jensen???), I'm now posting this yummy sounding recipe. Good job Maren.

Sweet Potato Ravioli
· 1 medium size orange sweet potato or yam, cut into large pieces
· 3 tbls. olive oil
· 5 ½ oz. ricotta cheese
· 1 tbls. chopped basil
· 1 garlic clove, crushed
· 2 tbls. grated parmesan cheese
· 2x250 g (9 oz.) packets egg won ton wrappers
· 2 ¼ oz. butter (oil or Smart Balance work great)
· 4 spring onions (scallions), sliced on the diagonal
· 2 garlic cloves, extra, crushed
· 300 ml (10 ½ fl. oz.) pouring (whipping) cream
· Baby basil leaves, to serve
Preheat the oven to 425 degrees. Place the sweet potato on a baking tray and drizzle with olive oil. Bake for 40 minutes, or until golden and tender.
Transfer the sweet potato to a bowl with the ricotta, basil, garlic and parmesan and mash until smooth.
Cover the won ton wrappers with a damp dish towel. Place 2 level teaspoons of the sweet potato mixture into the center of one wrapper and brush the edges with a little water. Top with another wrapper. Place onto a baking tray lined with baking paper and cover with a dish towel. Repeat with the remaining ingredients to make 60 ravioli, placing a sheet of baking paper between each layer.
Melt the butter in a frying pan. Add the spring onion and garlic and cook over medium heat for 1 minute. Add the cream, bring to a boil, then reduce the heat and simmer for 4-5 minutes, or until the cream has reduced and thickened. Keep warm
Bring a large saucepan of water to a boil. Cook the ravioli in batches for 2-4 minutes, or until just tender. Drain well. Ladle the hot sauce over the top of the ravioli, garnish with the basil leaves and serve immediately.
Subscribe to:
Comments (Atom)